

Congratulations on picking up your new ROG Xbox Ally or ROG Xbox Ally X! Whether you’re a handheld gaming veteran or just getting started, you’ve joined a growing and vibrant community of players who appreciate the flexibility of Windows and the power and ease of use of Xbox in the palm of your hands. While you probably picked up your Xbox Ally to dive right into your favorite games (we share some of our handheld favorites here), you’ll quickly discover that these handhelds offer tremendous flexibility to personalize your gaming experience. To help you hit the ground running, we’ve pulled together some must-know tips to make the most out of your new Xbox Ally.
If you’re just setting your device up, check out the informative guide at Xbox Support for step-by-step instructions. Of note: Don’t skip the option to set up the fingerprint reader; unlocking your Xbox Ally with just a touch is fast and feels a little bit magical. Once setup is complete, you’ll boot up directly into the immersive Xbox full screen experience, a purpose-built gaming experience.
Ready to go? Here’s a few helpful pointers.
Navigating your Xbox Ally
Master the Menus: The Xbox Ally gives you multiple ways to find what you’re looking for— you can use the d-pad, joysticks, shoulder and face buttons to make selections, or simply tap the responsive touchscreen directly. For instance, to reach the all-important Game Bar settings menu, you can press the Xbox button and hit the right bumper, or simply swipe from the left edge of the screen toward the center. Swapping between apps? Long press the Xbox button or swipe up from the bottom to access the Task Switcher, making switching between apps and games seamless.
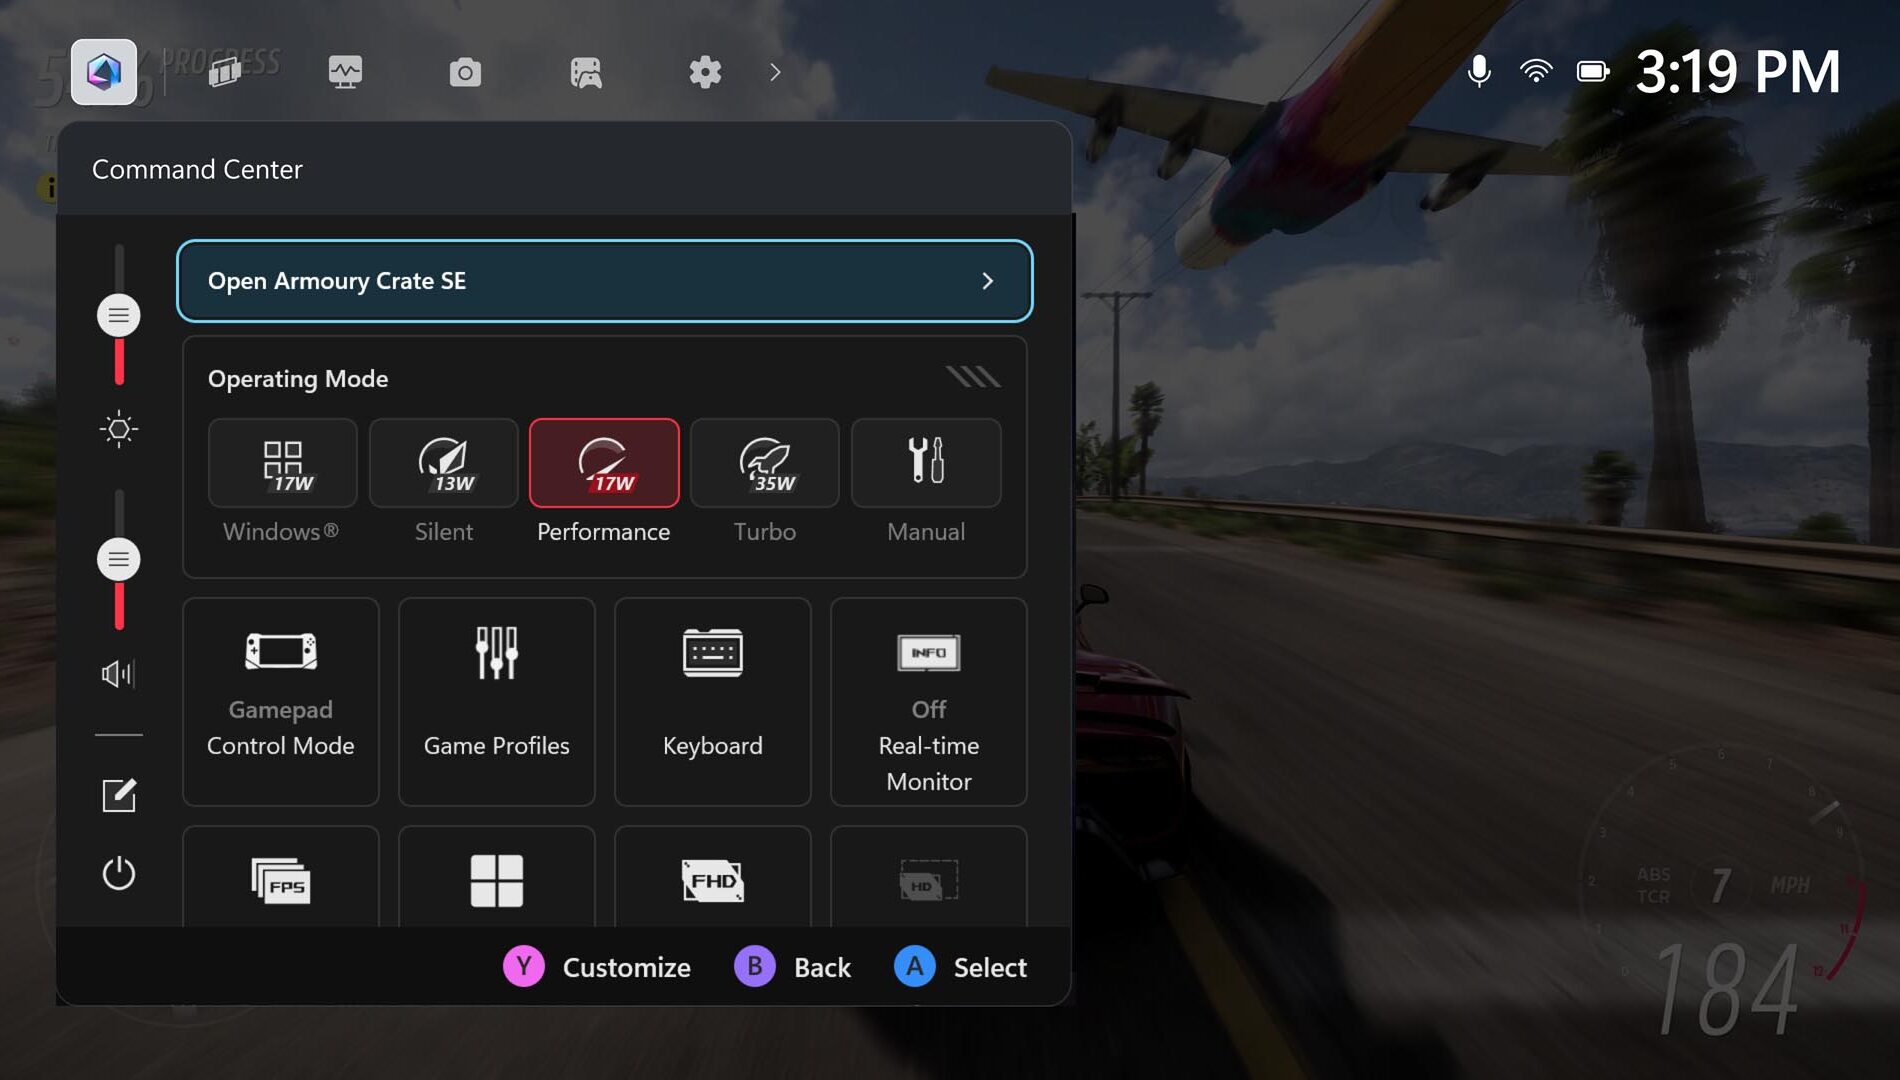
Get Familiar with Command Center: ASUS Command Center is now integrated into Game Bar, giving you instant access to many advanced features to personalize your experience, both inside and outside of games.
For a more expansive set of advanced settings and customization options, you can also launch the full-featured Armoury Crate SE right from this overlay.
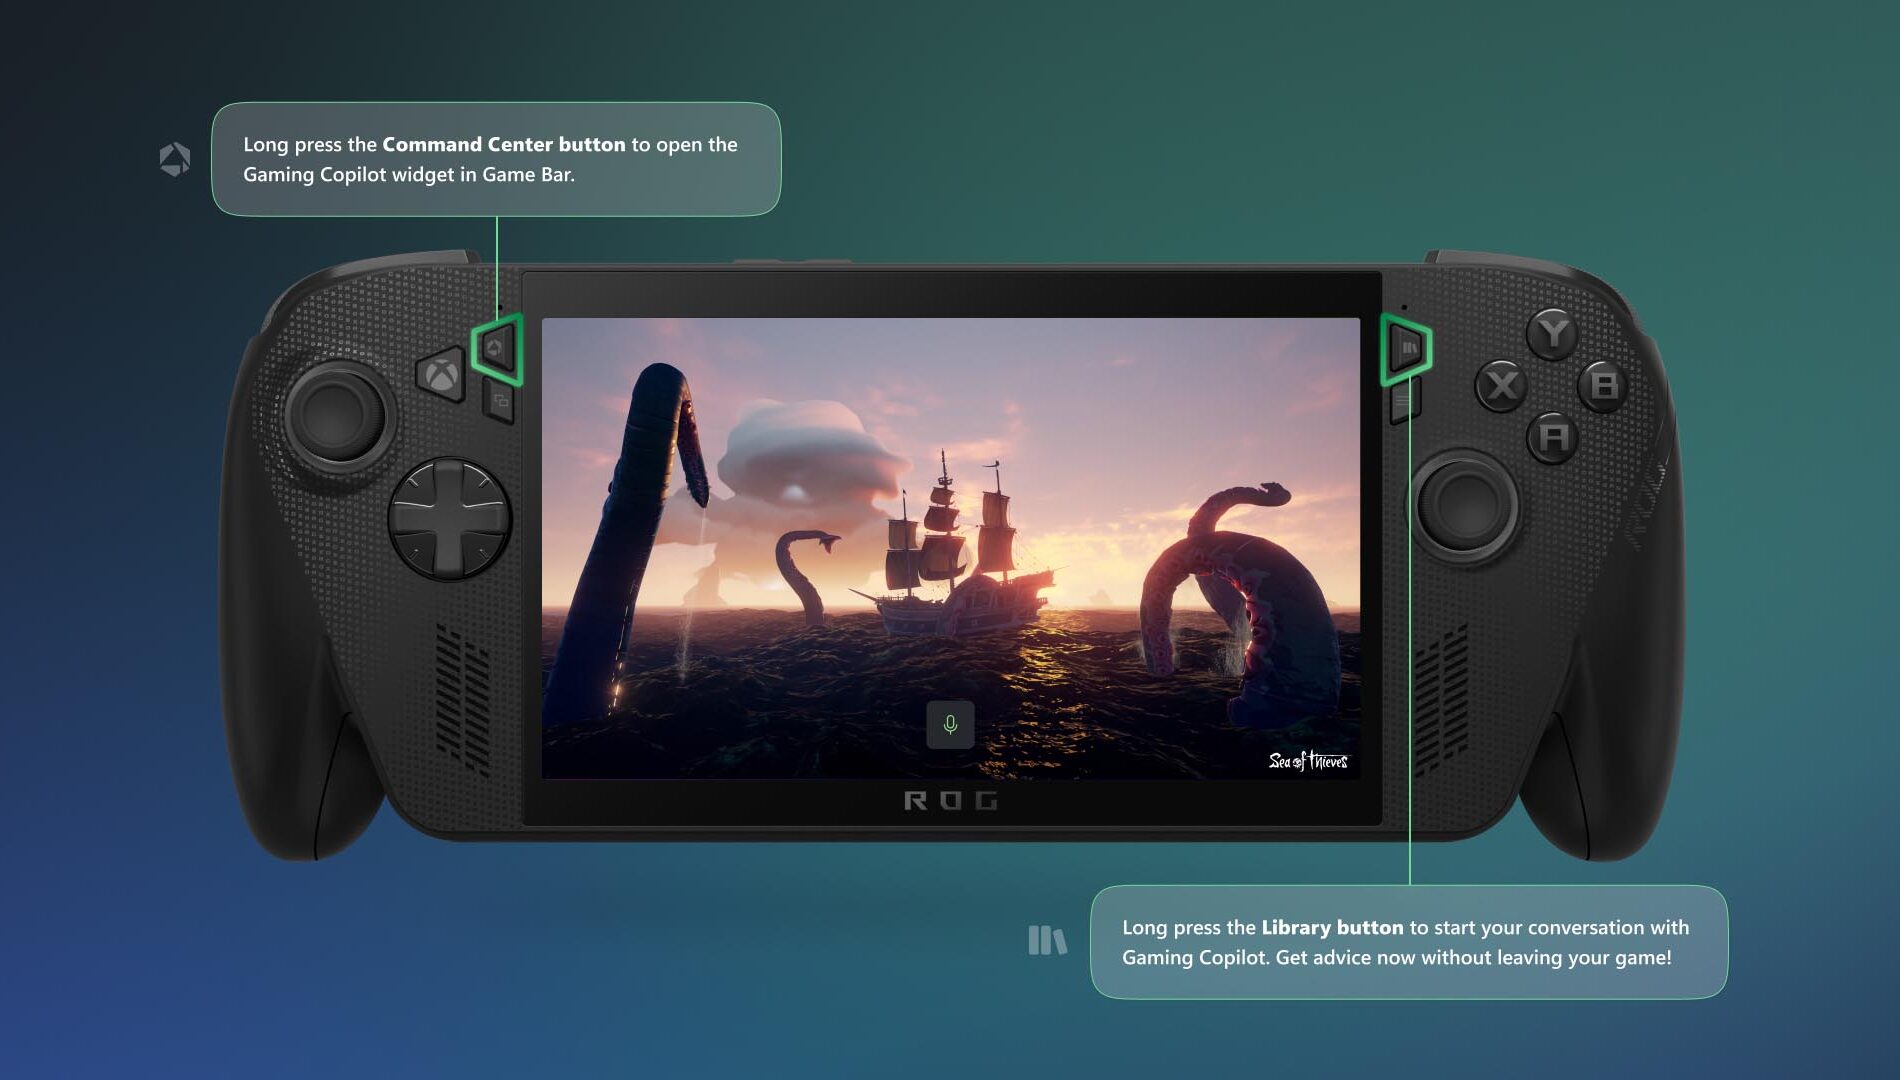
Meet Gaming Copilot (Beta) — Your Personal Sidekick: You can access Gaming Copilot on the Xbox Ally, where it offers recommendations, tips, and insights when you need them. To get started, long press the Command Center button to open the Gaming Copilot widget in Game Bar, and complete the onboarding experience. After that, if you want to check your next achievement or get advice for a tough boss fight without leaving your game, long press the Library button and then release to start your conversation with Gaming Copilot.
Play What You Want
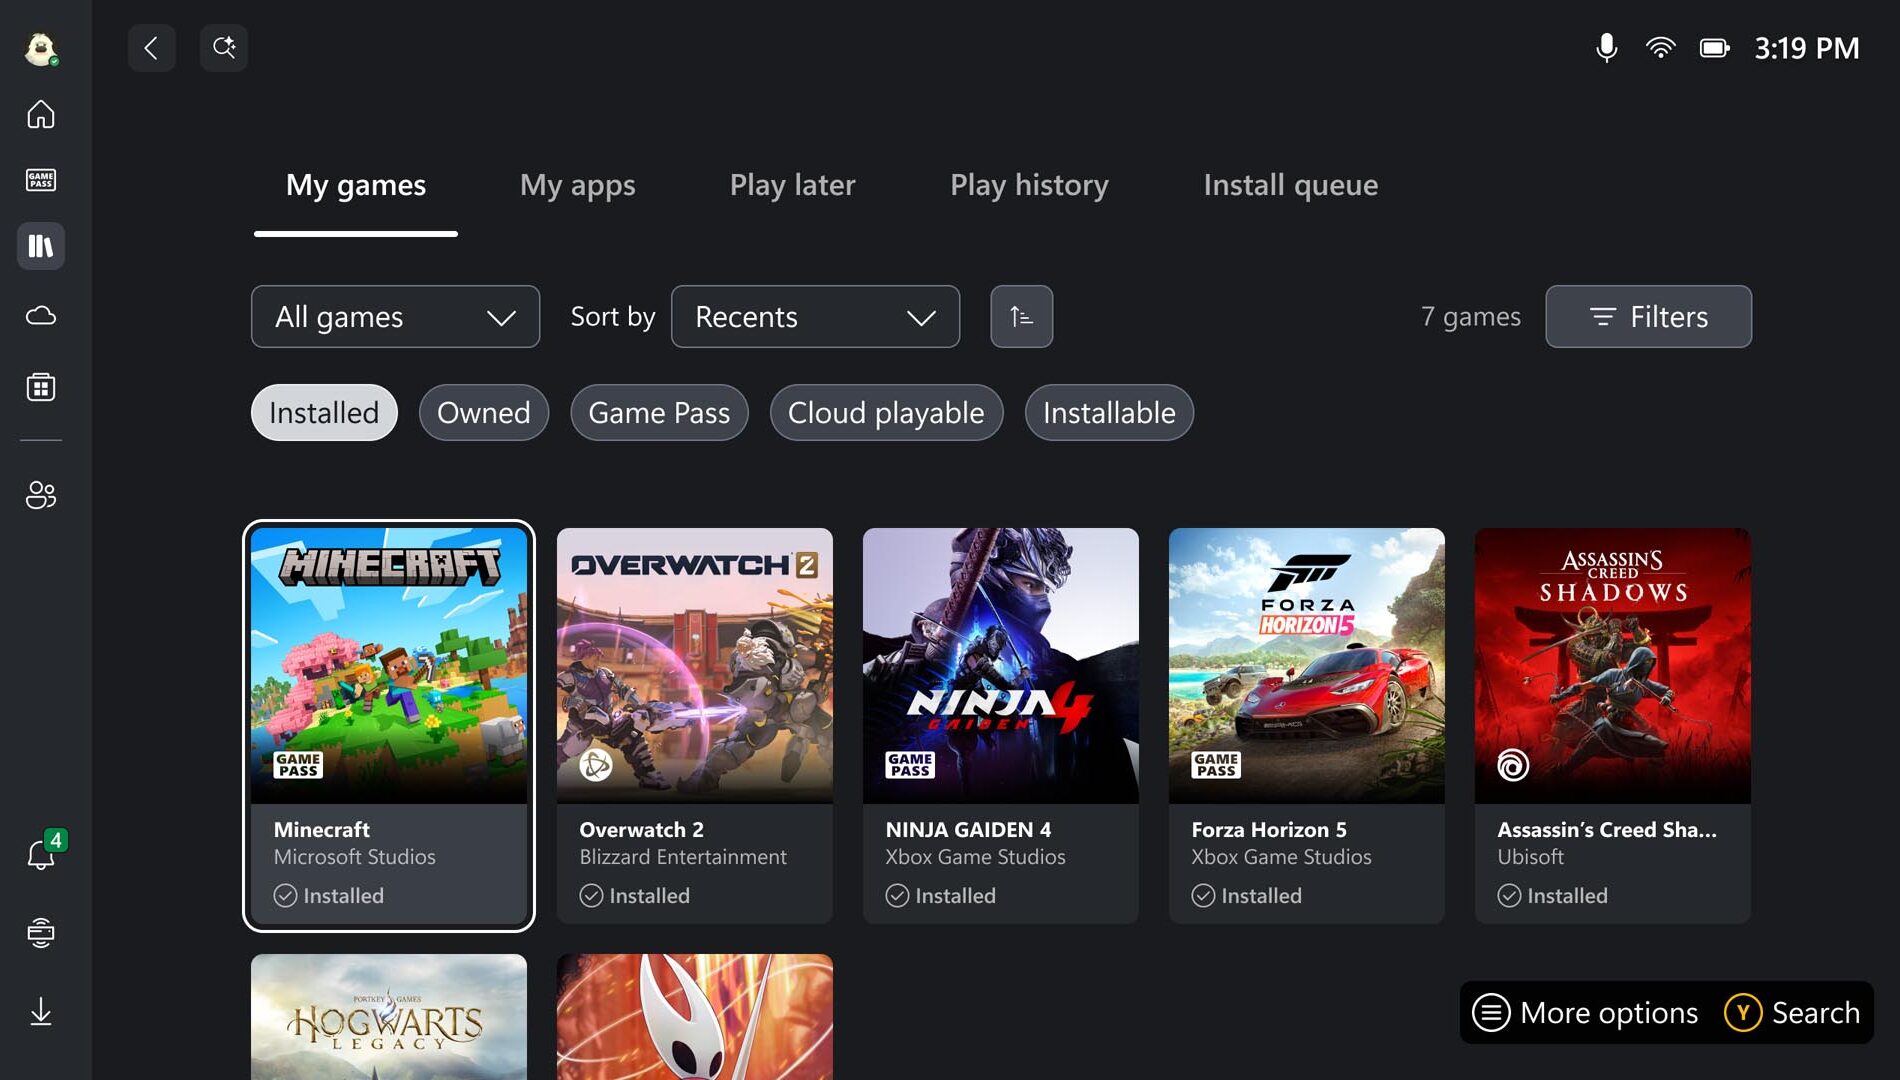
Browse Your Games Library: Now it’s time to find some things to play! Head to the Library by pressing the dedicated Library button above the right thumbstick to find games you already own, as well as those available with Game Pass, and titles playable via the Xbox Cloud Gaming. Note: you can select more than one category at a time; highlighting Owned and Installable allows you to go shopping in your own closet for games that play natively on your Xbox Ally. Looking for something new? You’ll find the Store on the left rail as well.
Access Your Games, From Leading PC Storefronts: With the aggregated gaming library, you can easily add your titles from leading PC storefronts to your library, to see all your games in one place. All you have to do is head to the My Apps tab in your Library, and select the PC storefront you want to install.
If you don’t see your desired launcher, open Edge (also located in My apps), navigate to the store’s website, and download it.
Play Anywhere—Including Offline: Handheld freedom means you’re bound to play in places without WiFi. While many titles work best online, most single-player games run great without a connection. Before you travel, test your games offline, pre-download any updates or DLC, and make sure you’re signed in. For detailed offline setup, see our guide: Play games in offline mode on Windows | Xbox Support. And if you’re flying, don’t forget to switch to airplane mode to save battery and avoid interruptions.
Personalizing your Setup
Play Your Way Using Accessibility Features: With the Xbox Ally and Xbox Ally X, the Xbox experience and Game Bar have been optimized for handheld use, bringing along familiar accessibility features from Xbox consoles and Windows 11 PCs. Most visual, cognitive, and sensory accessibility features can be found by selecting the Profile & Settings icon in the upper left of the screen, selecting Settings, then Accessibility. Input accessibility settings, including on-screen keyboard, input customizations, and the ability to re-map your Xbox Ally’s buttons are found in Armoury Crate SE.
Connect External Controllers: Pair Xbox Wireless Controllers to your Xbox Ally just like you would with a PC. Turn on your controller, hold the Pair button, and look for the connect notification. Missed it? Open the Game Bar, navigate to Settings > Bluetooth > Manage devices, select Add device > Bluetooth, and follow the prompts.
And don’t miss the clever detail: inside the underside of your Xbox Ally box lid, you’ll find a lightweight, sturdy paperboard stand—perfect for holding your Xbox Ally while charging or playing with an external controller without blocking the screen. This pairs well with the next feature:
Docking for the Big Screen: The Xbox Ally–is your perfect gaming companion when you’re on the go, and when you’re at home it provides even more options to play. It’s easy to connect an external monitor or TV for a larger, even more immersive experience . Simply connect your Xbox Ally directly to a monitor or TV or to a dock via the USB-C port,. For optimal performance, it’s best to use “Second Screen Only” to match your TV’s resolution and refresh rate.
Customize the Joystick Ring Lights: The Xbox Ally’s colorful lights surrounding the thumbsticks are one of its defining visual flourishes, but sometimes you may want to dim them for a red-eye flight or if you’re playing in dark room. To adjust them, open Armoury Crate SE and select Lighting to change how they pulse, or turn them off entirely.
Stay up to date: The Xbox Ally you take out of the box is only the starting point; Xbox and ASUS will continue to add new features and functionality to enhance your experience. To ensure you’ve always got the latest updates, there are two places you’ll want to check from time to time.
Windows OS Update:
- Open Game Bar > Settings Widget > More Settings > Open Windows Settings > Windows Update
- Install all updates and restart your device when prompted
Update Armoury Crate SE:
- Open the Command Center
- Select “Open Armoury Crate SE”
- Select Update Center > Check for Updates > Update All
We can’t wait to see where your new Xbox Ally or Xbox Ally X takes you. Whether you’re enjoying handheld gaming on the couch or setting high scores on the go, these tips will help you get the most out of every session.
The post Welcome to Your New ROG Xbox Ally: Essential Tips for Getting Started appeared first on Xbox Wire.